Friday, December 30, 2011

In My Scrapbook Room

Here are a couple of pictures of my Scrapbook Room and my class.  It's kind of a before and after.
I have really enjoyed having my classes and getting to know new friends.  My classes are starting to grow bigger thanks to my ladies that will bring a friend or two.   I just wanted to share with you some of the fun that we have.  

Here is a before:

Here is the after or I guess I should say the during:  This is just one of my groups.  Thanks Ladies for all the fun and laughs.

A Perfect 10 for Studio J® Members


Score a perfect 10 in January!


If you're a Studio J member, you can take advantage of this great opportunity to fill up your scrapbook.  Get your holiday photos in albums right away!  For every 9 custom-printed studio J layouts you buy, you'll receive the 10th layout free.  To receive the discount, just add 10 or more layouts to your cart.  You'll see a discount reflected in you order total.  And you can totally take advantage of this promotion by ordering in multiples of 10.  Buy 9, get 1 free.  Buy 18, get 2 free.  Buy 27, get 3 free and so on!  If you're not a member yet, now's a great time to join.  Just click Here and get started now.  
Offer is valid January 1, 2012 - January 31, 2012

Members save more, do more, get more!
• Exclusive patterns
50% off layouts
• Free JPG files
• Free monthly shipment
• Members-only promotions like this one!
Contact me for details.

Friday, December 16, 2011

DIY Desk Calendar, Art Canvas, and Vase

Ah, home sweet home, where we get to decorate to our heart’s delight! Add these beautiful DIY dècor pieces to your home to live inspired every day. We’ve chosen a sleek color scheme of Grey Flannel, Black, and White Daisy, with a pop of Pear, and we used the graphic flowers from the My Acrylix®Dreamin’ Workshop set to add subtle texture to the White Daisy paper in the desk calendar and art canvas. Here are a few hints for you as you create these chic projects.
Desk Calendar
Desk Calendar
  • Create the triangular base of this calendar by folding a 12" × 12" piece of chipboard at the 3" and 7 1/2" marks.
  • Insert three pins from the Bling assortment (Z1466) and clip the sharp ends if they protrude too much. (Tip: You can use hot glue on the back to anchor the pins.)
  • Cut twelve 3 1/2" scalloped squares from Pear cardstock using the shape on the Cricut® Art Philosophy cartridge (Z1686) and sponge the edges with Pear ink.
  • Cut twelve 3 1/2" squares from Grey Flannel cardstock and sponge edges with Grey Flannel ink.
  • Use the 3" chipboard squares from the My Creations® memory game (Z1614) for the date tiles. Stamp the background flower pattern in second generation using Grey Flannel ink and then stamp the month or numbers with black StazOn® ink. Sponge the edges with Grey Flannel ink. (Tip: Stamp two of numbers 1 and 2. Stamp one each of numbers 3 – 9 and 0.)
  • Back each month and date tile with the 24 pieces of cardstock and then punch a hole in the top for easy hanging.
Art Canvas
Art Canvas
  • Cut a piece of cardstock to the size of your canvas. (Tip: Do all your stamping and inking first before attaching the cardstock to the canvas.)
  • Select four or five alphabet stamp sets, varying the size and styles. (Tip: You can create this “subway art” look with whatever alphabet sets you have on hand.)
  • Choose a few simple icon stamps to fill in empty areas.
  • Play around with the placement and spacing of the letters and icons before stamping.
  • Stamp the words and icons with black StazOn® ink.
  • Attach the finished cardstock piece using a thin coat of Mod Podge applied to the canvas.
Vase
Vase
  • Cut out 130 2" scalloped circles from Grey Flannel cardstock using the shape on the Cricut® Art Philosophy cartridge (Z1686) or by punching the circles using the 2" scallop circle punch (Z1392).

  • Staple the circles together in stacks of five.

  • Squeeze and scrunch the edges then adhere two stapled sets together on the flat sides to create a spherical shape.

  • Sponge edges with Grey Flannel ink if desired.
  • Place the finished flowers inside a glass carafe or vase.
  • Wrap Sweet Leaf ribbon from the Designer Ribbon green collection (Z1616) around the neck of the vase to accent.

Saturday, December 10, 2011

Lunar Eclipse

I was lucky enough to see the Lunar Eclipse this morning.  I woke up at 4:15am and went outside to fine a beautiful crisp clear star light sky.  I started taking pictures but my camera was giving me trouble.  Even with my tri-pod set up my pictures were not coming out very clear.  I missed two shots with shooting stars.  One was just after a large shooting star with a long trail going by.  But I did watch in amazement as I watched it go across the sky.
I took lots of pictures every couple of minutes until I was too cold to stay outside. 
Here is just one of the pictures that I took

Sunday, December 4, 2011

Timesaving Gift Ideas


The gift-giving season can be an uplifting time of merriment and joy... but it can also feel a bit hectic. It’s nice to know you can count on Studio J® to help you give meaningful gifts that don’t require a lot of time or money. Here are a few ideas to simplify your life and save time.

  • Make one family layout and print multiple copies for everyone. (Time: 15–45 minutes) With Studio J, printing extra copies of a layout is as simple as changing the quantity on the checkout screen. Or, if you prefer, create one layout, then copy it into a new project as many times as you like and customize it for each recipient.
  • Give a Studio J 5-pack along with a Quick Pic™ album. (Time: 5 minutes) Since a 5-pack includes free layouts, free shipping, and free Memory Protectors®, it’s everything they’ll need to create a finished album!
  • Present a loved one with a 3-month Studio J membership. (Time: 5 minutes) A 3-month membership costs just $30 US / $33 CAN and is the perfect way to help someone “get their feet wet” with Studio J and give them complete access to a product you love. Combine it with a 5-pack to make it an extra-special stocking stuffer!
  • Give a gift certificate for one-on-one Studio J training. (Time: 35 minutes) With Studio J, you can create two 2-page layouts in just 30 minutes. Give a gift certificate for a 30-minute session of one-one-one training where I help you create two layouts. Once I’ve shown you how fast and easy it is to scrapbook the Studio J way, you’ll be excited to create more pages on your own!  Contact me at michelesinkitstampit@gmail.com to get your gift certificate.
So put on the holiday music, pour yourself some eggnog, and pull out your holiday gift list. Studio J is a great way to help you give the gift of memories—without taking much time!
You can started here or contact me at michelesinkitstampit@gmail.com.

Thursday, December 1, 2011

Holiday Gift Tag Video

This is quick and easy way to make several gift tags at once.  We all need a simple tag that can be put together in no time or just to have several on hand for when you need them.
Take a look and see for yourself.
I hate to say I told you so but "I told you so"!
They are just so fun to make too.
Want to get all the things you need?  Just click here.

Let me know which ones you made...

Thursday, November 24, 2011

Christmas Tag

Here is one of the Christmas tags that we made in my class last Tuesday.  It uses the November Stamp Of The Month (SOTM), Cherish The Day S1111 on the ticket part of the the tag.  This month when you purschase $50.00 or more you are able to get the SOTM for only $5.00.  That's a great deal.  It has 44 stamps on it.  WOW!  That beats any Black Friday deal out there, I think.  What a great stamp set to have.  I can think of 3 different ways to use the tickets.  Birthday's, Holiday's, and reminder dates.
The Santa is from Christmas Cheer D1494.  The No Peeking!,  To:, and From: are from December 25th C1469.  All of these are fun stamp set for this time of year.
I used the Believe Paper Pack and 3 Bitty Sparkles.  I do love my sparkles!!  The reindeer trim piece is from the cut away on the edge of the Believe Paper.  I just love the trim pieces.  The Santa is water colored in and I used Liquid Applique for all the trim on Santa's suit.  The ticket is a cut from the Art Philosophy Cricut cartridge (AP).  If you don't have this cartridge you don't know what you are missing.  It is so fun when paired with our coordinating stamp sets.  It truly is a must have.  The tag itself is cut from the AP cartridge too.

All products are Close To My Heart
Cardstock
Daisy White

Believe Paper Pack

Ink:
Holiday Red
Cranberry
New England Ivy

Liquid Applique

Stamp Sets:
Are all listed above.

Art Philosophy Cricut Cartridge Bundle

You can order all of this here

Wednesday, November 23, 2011

December Display Album with Holiday Wishes and Art Philosophy

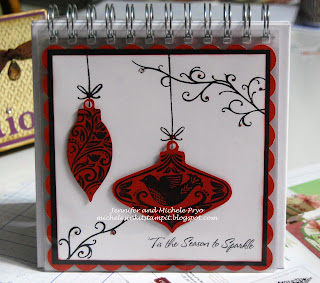
Well Jenn did it again! This months Display Album was a big hit in class.  My DIL has done a super job with this and I think she is having a great time coming up with the Ideas too.  Jenn used the Art Philosophy Cricut cartridge for all the cuts.  Jenn also used the new Holiday Wishes CC1015 stamp set to stamp over the Art Philosophy ornament cuts. You can get the Holiday Wishes stamp set this month for $5.00 when you order $25.00 or more of My Acrylix Stamp Sets.  That is a great deal!!! 
They are stamped with StazOn, Black for that striking bold look.  The Red Glitz Glitter Gel adds the perfect bling with it red sparkle.  The Black, White, and Cranberry make it look very elegant as well.  The whole class just loved it. 
 You can't see the red sparkles in the picture but trust me it's there. 
All products used are Close To My Heart
Cardstock:
Cranberry, Black and Daisy White

Stamp Sets:
CC1015 Holiday Wishes
D1446 Adorn-able

Close To My Heart Exclusive Cricut Art Philosophy Collection   Z1686

Glitz Glitter Gel:  Red
StazOn: Black

It's very simple and very easy let us know what you think.  We would love to hear from you.  Better yet come and join us in our class.  Check out the dates here
You can order all the things to make this here. 

Sunday, November 20, 2011

Coffee Anyone

I made these a long time ago for a table that would have the Coffee Pots and Hot Water on them.   But with the holidays coming up I thought they might be fun to post now.
They are cut from the From My Kitchen Cricut cartridge.  I don't remember any of the sizes and the paper is from a retired paper pack.  When I saw the paper it made me think of the coffee pot from the 50's 60's with the Gold star burst on them (Not that I am dating my self or anything).  When I was asked to make something for the coffee table the paper popped into my head.  I just love when that happens!  The funny thing was shortly after putting them on the table and before most of the guest arrived the Coffee one was gone.  They looked everywhere but never found it.  I took it as a compliment that someone took it because they loved it and wanted to use it too.
Well here they are


I just folded a rectangle piece of paper in half for the tent. Then attach the pot and the words to the front.
The decaf is cut with individual letter (not sure which cart. I used for that). This was done years ago sorry.... From My Kitchen does not have Decaf on it but it should LOL. No one ever asks for my input on these things....
Well like I said with the Holiday's coming up I thought they might be of use to someone who wanted to make them too.
Let me know if you make them. I would love to see what you come up with too.

Monday, November 14, 2011

Fall In Love With Autumn

If you love Studio J then you will love this latest How-To video.  Watch the video then try it for yourself here.
Studio J is so easy to use.  Give it a try and see for yourself.  It's like the old staying "Try it you'll like it".  The Dreamin' Paper pack is one of my favorite ones.
Let me know what you think.

Sunday, November 13, 2011

I love Banners Fall/Noel

I have so much fun creating banners.  This one is a Fall/ Noel Banner.
If you are a CMTH Consultant then you will remember the topic Consume it don't collect it at the 2011 Convention.  That was just one of my take aways.  I really took that to heart (no pun intended:)).  All the papers are ones that I loved and wanted to use for something very special but are no longer available.  So here I go consuming it.
I created this with two of my good friends Carol and Adrienne.  Thanks Ladies it was so much fun.


I would love to hear what you think.

Thursday, November 3, 2011

November Display Album Page

This is the November Display Album Page that my DIL Jenn came up with for our class.  She is doing such a great job with this idea I just love what she did.
If you would like to join any of my classes just let me know michelesinkitstampit@gmail.com.
You can find the dates and times here.
Yes she did make different backgrounds to choose from and all the coordinating cuts are made with the New Exclusive Art Philosophy Cricurt cartridge and the stamp set tells you on the carrier sheet what size to cut the shape at.  No guessing or trial an error to get the right size.  That is just so great.
You can see the other pages here

Cardstock and Exclusive Ink
Pacifica
Desert Sand
Barn Red
Goldrush
Bamboo
Vanila Cream
Olive

Stamp Set:
Harvest Happiness C1463

Paper Pack:
Dreamin

Olive

Chololate Ribbon

Place your order here


Tuesday, November 1, 2011

Happy Holiday Card Set

When you pair your new Close To My Heart Art Philosophy Cricut Cartridge with some delightful My Acrylix Stamp Sets featured in the Autumn/Winter 2011 Idea Book, and some Daisy White Die Cut card set with Envelopes you'll find yourself making an armfull of Holiday Cards in just one setting!  Watch this video and to discover even more tips for streamlining your Holiday card creation session.
These are quick and easy to make and the receiver will be very impressed with what you made.

All products are Close To My Heart:
Exclusive Art Philosophy Cricut cartdrige   Z1686
White Daisy Die-Cut Cards & Envelopes  Z1473
Holiday Cheer Stamp Set   B1381
A Holiday   A1115
Designer Ribbon Red Collection   Z1615

Have fun and let me know if you make them.  Shop with me here

Monday, October 17, 2011

Flashback Friday Challenge

I found a new challenge to try, it is called Flashback Friday.  It is a fun and easy one you just need to use your first tag that was posted to your blog.   I am re- posting this picture that I am using for this challenge.  It is the first tag that I posted to my blog.  I made it with the new Exclusive Cricut Art Philosophy cartridge from Close To My Heart and Provo Craft.  Here is the original post. 


This cartridge is a must have so if you don't have yours yet you can get it here.
Let me know what you have done with your cartridge.  I would love to see your artwork too.

Friday, October 14, 2011

Art Philosophy Fall Wreath

Here is why I haven't posted in the last couple of days.  I have been working on this fall wreath.  I just love the colors and how it turned out.  It took a long time but I think it was worth it.
I used all the flowers on the Art Philosophy Cricut cartridge.  I designed it on my Gypsy so if I ever wanted to do another one like in Christmas Colors or for a Wedding I wouldn't have to start all over.  I designed it in 7 different layers on my Gypsy.  Each layer is full of flowers or leaves.  I maximized each layer with different sizes to fill my mat.  On the layer with the leaves I used 5 of each leaf in different sizes.  This way I would have a few of each size in one color since i am using 12 x 12 sheets of cardstock.  I can't believe how many flowers and leaves it took.
Here is the start.  After I placed the first few flowers and leaves I thought to myself, "what were you thinking this is going to take forever".  But then I also thought, yes but it will last forever too.
For the flowers I used 4 sheets of 7 different colors.  It is the different colors that make this wreath pop.
I did roll all the flowers first to see what the different shapes and sizes looked like before placing them on the wreath.  I added the leaves as I went along.  I thought about placing them at the end but I could tell right away that it wasn't going to work.
I did use the hot glue gun to attach the flowers and leaves.  I did have fun placing and replacing the flowers and leaves before I glued them down.  I am so glad that I did not choose a larger wreath.
Half way there and I need to cut and roll more flowers. I do love how it is turning out. I guess I should have counted how many flowers and leaves it actually took.  But I bet you can see the answer would be a lot!  LOL!  I really am thinking about doing one for Christmas now.
I just love the Art Philosophy cartridge it has so many useful shapes and goodies on it.  I couldn't live without it.  OK! OK! I could but it makes my life so much easier because it is so versatile.
You can order your Art Philosophy cartridge here if you don't have one yet. 
So here is the finished wreath.
Lots of work I know!  But I do love it.
Let me know what you think.
All products used are CMTH unless stated otherwise

Cardstock colors for the flowers are:
Goldrush
Autumn Terracotta
Sunset
Smoothie
Gypsy
Sunny Yellow
Sunflower
Sizes were 5, 4, 3.5,3,2.5
The leaves:  were from the Mothers Day Bouquet Cartridge
Garden Green
Olive
New England Ivy
Sizes were 2, 1.75 I cut 5 of each color they were on one layer on my Gypsy
The wreath I bought at Beverly's it's 12".
Hot Glue I had on hand.

Hey! I only burned myself twice so I thought that was good. He! He!
If you want to see a video tutorial on the how to let me know.  Or even just a more detailed step by step.

Tuesday, October 11, 2011

Studio J Love Your Layout for October

If you love Studio J online scrapbooking then you will love this video.  If you haven't heard of Studio J online scrapbooking then you need to watch this video. 
Capture your life as it happens in Studio J.  Let us show you how to create this elegant layout, perfect for important occasions or special relationships.
You can watch all the videos from Studio J just click on my Labels tab for Studio J.  Have fun you can learn lots of tricks and tip. You can also see them all on the Studio J Blog here.
To start making your own layouts just click here.

Tuesday, October 4, 2011

October Stamp of the Month

This months Stamp of the Month Holiday Magic S1110 is a great way to get you jump started for the Holiday Season.  It has 18 images on it with sayings too.  I love the one that says May holiday magic fill your home...

Here is one of the things that I have done with it.
This one is my version of a card off the CMTH website on how to use the SOTM sets it has all the directions  and inspiration for you to be able to use the SOTM sets. 


All products are CMTH

The Envelope or Gift Box is cut at 8 1/2" from the Art Philosophy Cricut Cartridge
Pg 21  Shift> Font Layer> Flower1>  size 8 1/2> speed med> pressure 4> Blade 3.    **Your machine may vary with the speed, pressure, and blade depth**

Cardstock:  Bamboo, Cocoa, Kraft, Colonial White
Exclusive Inks: Cocoa, Cranberry, New England Ivy
My Acrylix Stamp Set: Holiday Magic S1110  ***Get this for only $5.00 when your purchase $50.00 or more.
Ribbons: are from my stash
Tag:  Cut from TBBM page 94 Shift> CrCtp1-h> @ 1 1/4"  speed med> pressure 4> Blade 3. **Your machine may vary with the speed, pressure, and blade depth**
Be sure to check out Jeanette Lynton's Blog for her shape of the Day she made a beautiful one.

I can't believe how much I use my Art Philosophy Cartridge.
Let me know if you want one too.

Monday, October 3, 2011

Buttoned Up Card Set

Lovely, chunky, fashion-forward bling turns your cards from charming to super-fantabulous.  Learn the WOW techniques in this how- to video from Close to My Heart, and then send holiday cards that people will be talking about in to the New Year!
You will have fun making these.  Let me know if you have any questions.

Sunday, October 2, 2011

October Display Album Page

Here is the latest page for our Display Album that we made this month in Class.
I had several new ladies in this class and they did a great job.  They were able to catch on to all the different techniques as we went.
My DIL Jennifer came up with this and it is another great page for our Display Album.  She is very talented and we have a lot of fun in my Studio creating new things for fun and for my classes.  She is a very busy Mother of 2 of my Grand kids.  So when she wanted to help me out with this Display Album I was very excited.
Here is the link to the September post that she came up with.
My SIL is using hers for birthday reminders.  We added lines so you could put all the names and the date of those in the family who have birthdays that month.  I thought that was a very cleaver use for the Album.  I will post them altogether when we are finished.

All products are CTMH unless stated otherwise.
Cardstock:  White Daisy, Barn Red, Black, Grey Wool
Mischief Level 2 Paper packet X7144B
Exclusive Inks:  Grey Wool, Black
VersaMark Ink Pad
My Acylix Stamp Sets used:  Spellbound C1374, Fright Night B1359, All Hallows Eve C1462
Close To My Heart Exclusive Art Philosophy Cricut Cartridge Bundle Z1686 page 13
Paper Crimper Fiskars
My Creations Display Album Z1054
Order these items here.

If you would like to make one just let me know.  Here is a list of my class schecules if you want to come and join us.
 

Saturday, October 1, 2011

Happy World Card Making Day

Today is World Card Making Day.  So I thought I would share one of my Christmas card for this year.  This is a very simple one that I just loved from the Autumn/Winter 2011 CMTH Idea book.  It is on page 120 if you would like to see the original.  I did not have some of the things they used to I changed it up a bit.  Be sure to check out Jeanette Lynton's blog for some great ideas too.
All products used are CMTH
I used all the same colors:  Barn Red, Cranberry, Bamboo, Cocoa, Kraft.
Inks were Cranberry and Cocoa
I did not have the cranberry ribbon so I used paper and folded it into pleats.
The white ribbon was from my stash
The pin clips Z1612 are new and I just love them.  I just tucked it behind one of the pleats so the pin part was not exposed.
The dove was cut on my Cricut using Tie the Knot page 35 shift> dove2s> @ 3/4"
Stamp Sets used were:
Remarkable Wreath C1473  **This is a must have I have lots of ideas for this one all year long.
Fill in the Blank D1493  **it has the dove it you don't have a Cricut, and the sentiment
I sponged around everything with Cranberry ink.
After taking the picture I thought I should have used some Bitty Sparkles  Z1263 for the bling!  Next one.
Click here to order yours
Have fun creating one of your own. 

If you want me to show you how to do the pleats just let me know.

Friday, September 30, 2011

Typeset Workshop on the Go

Typeset is great for all kinds of pictures.  I used it here with my grandson dancing like Fred Astaire in singing in the rain.  Only it was just him singing and dancing to his own drummer.  He is so fun and full of life and this says it all.  What a fun kid to be around.  I really need some of his energy...

If you would like to do this WOTG just let me know and we can schedule a time and date for you.  Be sure to capture all the fabulous moments that you can. 
The Workshops on the Go Typeset
Has everything you need to do these pages + lots more.
In the Kit you get:
6- sheets of B&T paper (2 each of 3 double-sided designs)
6- sheets of Cardstock of coordinating solid colors
1- My Acrylix Typeset Workshop Stamp Set
1- Milepost Shapes
1- Create-a-shade Pearl Paint
1- Instructional Brochure
It has instructions for both Cricut Cuts and None Cricut Cuts
All for only $29.95  G1024  see it here.


Check out Jeanette Lynton's blog for more layouts.
Its never to late to start so Let Me Show You How.

Saturday, September 24, 2011

The Chore Chart

Here is the Chore Chart that Jenn my DIL made for the grand kids.  I think the the kids will love the look of it too.  She used the Typeset paper pack and the Cork Letters on a cookie sheet.
This should keep them on track don't you think.
I will put up a photo of the rest of the things that we put together on the wall.  I think that you will like it a lot.  Jenn used  magnetic tape on a roll for all the strips and dots.
One of the stamp sets is this months Stamp of the Month for September
Limited Edition    S1109
Typeset Paper pack   X7139B
Typeset Complements Canvas Shapes  X7139C
Vintage Type Stamp Set   D1481
Color-Ready Alphabets Cork  Z1450

 Leave us a comment and let us know what you think.

Tuesday, September 20, 2011

Here is the Clipboard with Cherry-O

Here is the Clipboard that Adrienne made.  I forgot to take a picture before they left but Adrienne sent me one.  She loves Cherry-O so we are trying to use all that I have left.  She did a great job, since she is a Kindergarten teacher she will get a lot of use out of it.
This is the back side.  She left the front with just the paper because she will actual use it a lot and different layers make it hard to write on.
It was such a fun day with her and her Daughter.

Friday, September 16, 2011

Look Mom what I made at the Workshop!

Yesterday I had a Mother and Daughter over to do projects.  They made a clipboard, and started a scrapbook on Caitlin's trip to Belize on a Dig Site. Caitlin also made a picture frame for Halloween.
Here is the picture of the picture frame she made.
Can't wait to see the picture she puts in it....  Maybe she will share it with us.
Here is the stamp set she used.  What a great one to have on hand for Halloween.

All products used are CMTH
She used:
Mischief Paper Pack   X7144B
All Hallows Eve Stamp Set   C1462
Art Philosophy Cricut cartridge  Z1686
Black Ink pad  Z2105
Grey Wool Ink pad  Z2124
Autumn Terracotta Cardstock  Z5915
VersaMark Ink pad   Z891
Clear Detail embossing powders  Z821
Caitlin cut out the Crow and Candelabra with a Cutting Knife   Z1252
Order Yours Here

This is one of the Dollar wooden frames from Michael's.  I love having these on hand.  They make great gifts too.
Let me know if you would like to do some projects.  I will be happy to schedule a day and time with you or a group of your friends.

Deep Discounts and Retired Products while they last!

I have lots of discounted and retired products available to you at phenomenal prices.  Check back often to take advantage of these products that are offered while supplies last!  So please take advantage of this while you can.  Here is the place to look!

Wednesday, September 14, 2011

Love Your Layout #5 Video in Studio J take a look

Here is the latest video in the Love Your Layout series for Studio J. 
Memories last forever, but preserving them only takes a moment when you use Studio J!  Create this darling layout in only 30 minutes or less and express your love for someone dear to you

Let me know what you think. 
My Studio J. class is the 3rd Tuesday of every month.  I have an evening class that starts at 6:30pm.  Let me know if you want to join us.  You will receive a special gift when you attend your first class.

Friday, September 9, 2011

The Group at the Lake

Here are some of the pictures of the Group at the Lake.

Fixing Mistakes tip and Shipping my Cards tip

I am using this card in the H2H Challange this week too.  Stop by and check out what the others have done too.
When I was making my card for our Cards at the Lake I cut one piece of paper at the wrong size.  I hate to waste my paper so I decided to see if I could work it into the design.  I was using the card on page 32 from the CMTH Autumn/Winter 2011 Idea Book.  I started to cut the orange strip and realized that I was cutting it the wrong size so I stopped and cut it the right size.  It was only about 3/4" long slice.  OOOOPS!
I thought well maybe I can still use it and not have to cut another piece.  So I sponged the edges just like I wanted for the card.  The picture in the Idea Book has 2 wooden buttons but I will try to hide the cut with a ribbon instead.  I used some sheer chocolate polka dot ribbon from my stash.
I also move the scalloped oval C1463 Harvest Happiness on page 35 over the the Rt more and stamped a couple of extra flowers.  I love this stamp set C1465 Unscripted it is on page 36.
I wanted to add some Pacifica ink because I thought the blue would be a nice touch to my card.  I also added some Autumn Terracotta ink as well.  I like how it turned out.  What do you think?

I think the ribbon hides the cut and you can't even see it at all.  I also used the a different flower from the Art Philosophy Cricut cartridge. I used Banner 1> Font at 3".  I was very happy with the way it came out.  I just can't say enough about the Art Philosophy cartridge and not just because it is CMTH.  It really has a little bit of everything on it and you can do so much with all the basic shapes. It has circles, squares, ovals, rectangles, and scallops in every size.  For me that means no more carrying around several extra pounds of punches.  I have it all loaded onto my Gypsy and off I go.  I know I have what I need right at my finger tips.

When I ship my cards and they have something that sticks up like my flower.  I will use a slice from toilet paper roll or a paper towel roll (the cardboard part when the paper is gone) and place it around the object.  If I need to I will cut the tube and splice as many as needed to fit around what I want to protect. 

Remember there are no mistakes in scrapbooking.  Okay, Okay maybe a few.  But try to use them like a challenge.
Let me know if this helped you out?  Or what you have done.
Thanks for stopping by.

Thursday, September 8, 2011

Card Making at the Lake

This year we did something new for this holiday my SIL had everyone bring a card to make for 10. If you didn't bring a card to make then you brought snacks for everyone.  Saturday night we had a Turkey Dinner with all the fixing.  I always make at least 10lbs of Mashed Potatoes when we have Turkey.  Sunday the Dads kept all the kids and we spent most of the day card making.  Everyone taught a technique and their card.  I brought my Cricut and my Gypsy so everyone could try it out.  It was so much fun.  Here are the cards we made.
Our first card was made by Kathy.  Her favorite cartridge is Life's a beach.

The Second card was made by Jodie.  She used the Country Life cartridge.

This one was created by SIL Debb this was cut from the Songbird cartridge.

Lani my SIL is a Stampin up consultant and these are the two that she taught us.

Lani forgot her oval punch so we cut out ovals and leaves on the Cricut.  I just love my Cricut.
Jenn my DIL made this card using the September Stamp Of The Month.


I recreated a card from the Idea book on page 32 with the Dreamin Paper Pack and a flower and tag  cut from the Art Philosophy Cricut cartridge.

I also made a paper lunch bag card but I can't find it to take a picture of.  Oh well next time.  Everyone came up with some cute cards I can't wait until next time.
What a fun weekend we had with all the extended family and friends.  It was a great way to end the summer.  It was like a prelude to Thanksgiving with the Turkey Dinner.  "It was the best Turkey I ever ate".  Mike my nephew makes the best Gravy and Tom BBQ's the Turkeys, yes Turkeys they were so tender and juicy.  I hand mashed 10lbs of potatoes.  Everyone brought a side dish and my niece Amy made Pumpkin Pie.  Well lets just say that if you when home hungry it was your own fault. 
The next day we had Turkey sandwiches and they were so good.  I can still taste it.
I hope that you all had a fun and safe holiday too.

Monday, September 5, 2011

Thanksgiving Card: Project Inspiration Autumn/Winter 2011 Idea Book

Stretch your stamping know how.  Fashion an intracte-looking stamped image with the greatest of ease!  We'll show you how  in this video featuring the Thanksgiving card from page 66 in the Autum/Winter Idea Book

Tuesday, August 30, 2011

Archive your Vacation Photos

Did you enjoy a fabulous summer vacation or even a weekend getaway?  We've got a beautiful way to capture those memories in Studio J.  In this episode of Love Your Layout, you can archive your summer vacation photos in a snap!
Watch this Video.
If you have any questions or what to know more about Studio J. please contact me.  I will be glad to help you.

My Happy Bags

I have a new addition to my Happy Bag collection. 
I just love bags, my SIL Debb makes beautiful quilts and one day she made a bag to carry some of her quilting stuff in.  Well I fell in love with her bag.  I will post a picture of her bags at a later date.  When my birthday came around she gave me this bag and it was the start of it all.  Debb called it a Happy Bag because it makes you smile when you see it.  I love sunflowers, so the sunflower material was perfect for me.  It has pockets on the outside and pockets on the inside too, it holds my CMTH paper packs perfectly and there is plenty of room for my embellishments too.
This is Happy Bag #1

For Christmas I got Happy Bag #2
She traveled all over France with me and was pictured in Monet's Garden, Normandy,  Amboise, Musee d'Orsay, on the top of the Eiffel Tower, and all around Paris.  I got lots of comments about how beautiful she was.  It was a great conversation starter.
So here she is Happy Bag #2


Last night when my Husband came home from Bocce Ball he said "Here Debb said you would know what this was for"  I thought I would scream.  My Happy Bag #3 it holds my Cricut E. it stay open so I can load my E easily.  It has 2 large pockets that can hold all my accessories.  This is so cool.  I can't believe she made me one.  I love it.
Here is Happy Bag #3

I can't tell you how much I love these bags.  If you see this Debb Thanks I love, love, love it.  I already have an embellishment in mind with a new technique that I saw.   I will post that later.