Tuesday, May 29, 2018

Zella Teal Mini Album

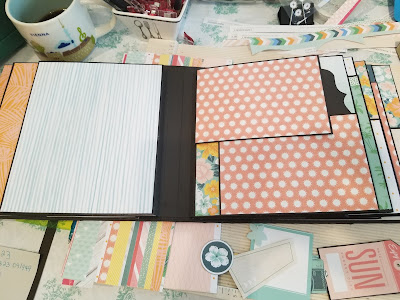
Here is the Zella Teal Mini Album that I made for my Granddaughter she went on her 8th grade school trip to DC and New York.  I made this Album while I was at a 3-day Crop up in Dixon at It's All About the Scrapbook.
I love making these Mini Albums.  I use the tutorial from Country Craft Creations (Country Kitchen) I really like how the spine works.  It allows me to embellish more so that is fun!  You can see this in my Video.  It has lots of pockets and photo pages and pull outs.

The measurements are 8 1/2" x 8 1/2"  with a 3 1/2" spine.  It is not done yet but I know how everyone loves to see the progress in the making.  I will upload another video when it is complete.

Grab a drink or you favorite cuppa coffee, tea and enjoy.  I tried to keep it short but we all know how that goes.


Thanks for stopping by and see you soon!
I am trying to post every Tuesday and Friday so keep checking back.


Related Posts Plugin for WordPress, Blogger...

Friday, May 25, 2018

Mini Album for my Germany and Austria Trip


I made this album with my Sister-in-law Lani.  We had a great time putting it all together.  I am using it for my Germany and Austria trip.  I have so many great memories of this trip and I want to be able to look at my picture and remember everything about it 
You can see it here in my video.  I am not done yet but you will be able to see my process.  I should have titled it Part 2.  I will be showing it to you in a series as I complete them.
I will try hard to keep them short and sweet.


Thanks for stopping by and keep checking back for more!


Related Posts Plugin for WordPress, Blogger...

Tuesday, May 22, 2018

Making Embellishments

Last weekend my Sister-In-Law asked me to cut out some Eiffel Towers on my Cricut.  It was kind of a funny back and forth conversation about how tall, how many, what color. I needed to know what it was for to decide on which Eiffel Tower to us.  There are quite a few.
I finally narrowed it down to the one you see below.  I think it was the perfect choice.
Here is what we started out making.  We had to use what we had on hand.


Next, she had cut out some bags from waxed paper sheets and we embleshed them too.


Here is the bag completed.  I love how it turned out.  I will be making more like this.  Well no exactly like this but you know what I mean.  Lol!


I ended up making 4 of the page tags.  One of the tags with the Eiffel Tower on it will go in a Mini Album I made for my Mom's 95th Birthday.  She was born and raised in France.  She passed away just 2 week before her birthday and I put the book out at her funeral.  I get great joy looking through all the photos of her and my Dad.  I think she would have loved looking at it and the memories.

Thanks for stopping by.


Related Posts Plugin for WordPress, Blogger...


Friday, May 18, 2018

Kard Klub Swap May 2108

It's been awhile since I have posted about cards I have made so this will be a change of pace from my Mini Albums.  Our theme this month was Clocks or Time.  I have had a hard time coming up with an inspiration for any of my cards lately and I am sure it showed in my end result.  This time was different.  I first started with Pinterest but no luck.  I just bought the Graphic 45 Square Tag & Clock Metal Die (not even thinking about the theme for this month).
I got out the Die and started staring at it.  I decided to just cut one of the clocks out with CTMH Gold Glitter paper and see if I like it.  I loved it.
I had purchased some paper doilies that I bought when I was at a crop at It's all about the Scrapbook.  Then I got my new Floral Shoppe paper from G45.  Wow, it's gorgeous.
I did purchase all my G45 and die at Country Craft Creations


The finished product.  My sentiment, Every moment is a gift, fit with our theme of Clock or Time.
It fits into my life at that moment too!  I have a good friend that is in the hospital on life support and thinking about her and her family at this time was how I came up with this sentiment.


I am all set and ready to go with my cards.  I always make 12 and bring home the extras.  I really never remember how many of us there are.

So let's get started with the first card in the group.  Grab your favorite beverage and here we go!

This card was made by Debb she stamped it with the clock stamp from CTMH called Make It count and the Embossing folder that she used was by Darcie.


This one was made by Donna.
She used a shimmer paper, and the same embossing folder as Debb did.


Then Jeannine used the Cricut cartridge Sophisticated to cut the clock out and a Stampin Up stamp set Timeless Treasures and the flower is from Petite Petals


Cathy used a printable from Pinterest for her Cuckoo Clock and then embellished it with punches, dies, and gems


Lynn's card is made with various Anna Griffith items.  She used a variety of items from different packs


Laurie made hers a Cuckoo Clock too.  I love this paper.  She used a Tattered Lace Die.


Kathy our hostess made this one it is cut from the CTMH Artiste Cricut cartridge


This is Erin's card her and I both used the same die from G45 Square tag and Clock die.  This card is beautiful and shows up better in my video.


This one is mine and you already read all about in the beginning.


Here is the video that you can watch that has them all.


Thanks for stopping by.  If you have any questions about any of the cards just let me know.


Related Posts Plugin for WordPress, Blogger...

Tuesday, May 15, 2018

Close to my Heart Seasonal Expressions May-Aug 2018

I finally got time today to make a couple of videos.  This one is a walk-through of our Seasonal Expressions catalog.  We have some very fun paper packs and stamp sets in this one.  So grab your favorite beverage and let's get to it.


The video is editing and it will switch to landscape in a few minutes.  Don't get a kink in you neck just check back in a few. 
At least this one loaded.  2 of my other videos are nowhere to be found.  I guess I will have to remake them. 


Related Posts Plugin for WordPress, Blogger...

Friday, May 11, 2018

Notepad Folio

I am making several of these Note Pad Folios.  They are quick, easy and fun to make.  They take 4 sheets of pattern paper so it is a great way to use up any leftovers that you might have.  I use 2 sheets of 2 different paper.  I wanted to take them to a craft fair that I was in to see how they would sell.  I thought these would be great for Teacher Appreciation or a hostess gift.  They would even make a great Thank you gift.  I thought that making 6 of them would be a good start.  If they didn't sell, well then I would have some gifts already made to give away.  Its a win, win!

Here is the front, I followed a video on YouTube from Your Book of Memories.  I used paper from my stash tub and found 2 sheets that I like and that would go together.  Luckily I  keep my papers packs together in the clear bags so that way I can see what I have when I am looking for a certain one.  That really helps for things like these.   I used scrap pieces of white for the banner pieces, mat.  I love how it turned out.  I just doodled inside the white pieces and wrote Notes on the front.


This is the inside and it will hold a pen, a pad of paper, and has a pocket to hold things you need.
I added a cute topper to the notepad and just used a CTMH scallop border punch.  I bought the notepads at the dollar store and the pens were on sale at Staples.  They came in assorted colors so I was able to match each book and pen.  Fun when that works out.  I will be making more of these for sure.


Here you can see that I used a ribbon closure that is just one long piece.  This too is from my stash.
the dimensions are 8 1/4" x 5 1/2" x 3/4".


I did them all assembly line style. I cut all the chipboard fist.  Added my score tape, then covered the book with cardstock, then cut out all my patterned paper, then added the score tape.


 Next, I added all the paper to the inside.


You can see that I used a lot of score tape.  I get mine on Amazon.  I have used glues and other double-sided tapes and Score Tape seems to work the best and hold too.


Next, I cut the pockets from the same cardstock as the book and covered it with a coordinating patterned paper.  Then I made the pocket out of the same cardstock as the book and covered it with the coordinating paper too.  That is not in the picture???  Guess I miss that one.  LOL!


You can see the first photo at the top how I did the fronts they were all pretty much the same.  I did sell 2 of these.  Not much sold for anyone but I did have a great time.  Like I said above, I now have some gifts on hand to use.

Thanks for stopping by.  If you make one let me know I would love to see them.


Related Posts Plugin for WordPress, Blogger...

Tuesday, May 8, 2018

My Tri Fold Folio with Gimme Some Sugar.

 Here is a my Tri Fold Foliol, I used the Gimme Some Sugar paper pack.  If you like this paper pack and want to get it you better hurry it is in our going soon category so once it is gone, its gone.
I followed a tutorial from Country Craft Creations then added my own spin on it.  I love how it turned out.  I will be making more of these.  Great Gift Idea.

Here is the front and the Gimme Some Sugar Compliments pack.  On the Cover I used some of the cut apart cards in the paper pack and some stickers form the Compliments pack.  I love the card that says "just roll with it"


Here you can see the pocket page that you can slide the small size legal pad and still have pocket to put notes in or recipe cards in.  It also had a piece of ribbon for the pen holder.


When you open it up all the way you will have a angle pocket to store things in as well.  I added a tuck spot with a chipboard piece for the compliments pack.  Its says" Make your words soft and sweet- you never know which ones you'll eat.  So True!
The far right page has a little box that will hold a pad of post-it-notes.  That is very handy.  I added one of the pieces from the compliments pack so you could tuck things behind it too.


Here is the little box open so you can see it better.


You can see all the folds and flaps better from this angle.


Thanks for stopping by and taking a look.  I used this as one of my giveaway prizes and a craft fair that I went to.


Related Posts Plugin for WordPress, Blogger...

Friday, May 4, 2018

Postcard Perfect Mini Album

Postcard Perfect CC5185 is a new paper pack from Close to My Heart.  I just love the colors and how they are perfect for a trip we just took to Kauai.
Because my album was 8 1/2" by 8 1/2" with a 4" spine I needed more paper that was in my pack.  The great part about CTMH is that the color palette matches with other paper packs.  So off to my stash I went and sure enough, I found quite a few papers in older packs that would match perfectly.  Like Hello Lovely,  Whimsy Fundamentals, (the Fundamentals paper packs are great to use along with our Seasonal paper packs) just to name a few.  I love being able to use things from my stash. That way I do feel so bad hoarding it.  LOL
I followed the tutorial from Country Craft Creations.  It originally was a Country Kitchen album.
The cut-a-part page has so many cute things on it and I will be using them all.  Well except for the flamingo.  Last time I checked there were no flamingos in Hawaii.  I just Covered up most of the flamingos with photos or embellishments.
Here is the front cover.  I used some of the cut-a-parts on the cover and I like how it turned out.  It is not done yet. I love the spine it is in 3 sections and on the inside are just 3 pages.


This is the inside cover and the front of the first page of the first section.  3 of the papers used on these 2 pages are from my stash and you would never know that they didn't go together.  You can see some of the cut-a-parts below the book on my table.


Next pages I use parts from the Cut Above Kit CC5182.  These are meant to be used as a Scrapbook layout but you know me, I have to use them in other ways too!  The Cut Above paper is the back paper on these pages.  You can only see the leaves below


These are all from the Postcard Perfect papers.  The left side is a pocket page.  This is where I will put some of my photo from the Kawaiele Waterbird Sanctuary.


Here I used papers from my Stash.  Under the 2 flip out photo holders are paper from the Postcard Perfect.


You can see the back side of the photo holders and the pocket.  I cut out tags with my Cricut Maker in different shapes and sizes and placed them throughout my Album.  The always come in handy for holding journaling and photos, or both.


This page has more flip outs for photos.  This Album has plenty of room for landscape or portrait photos.


Under the flip outs on the page, I used part of another Cut Above Layout page.  I used this section for the photo of all our food.  Yep, I will put it all on one page.  Well only when we ate out that is.


I love this pocket page and all the things you can use them for.  I put tickets photos and journaling in them.  Both sides have pockets.


The last pages in the Album is a pull out so you can put more photo or memorabilia.  On the inside back cover is a large pocket for tags, programs, or whatever you want.  I really like how this Album turned out I will do a walk-thru on my YouTube Channel soon.  I will have all the photos in it and embellished so watch for that.

The back cover paper is from my stash and in this photo, you can see the spine.  It is in 3 pieces so it will mold its self to how full the book is.  I will be making more of this size and shape Album.


Here is the front again.  This is by no means finished.  I will keep you posted with a complete walk through when I am done.  So keep checking back.


Here are just some of the Print then Cut items I made with my Cricut Maker to use in my Album.


Thanks for stopping by and looking at all the photos.
Let me know if you have any questions at all.


Related Posts Plugin for WordPress, Blogger...